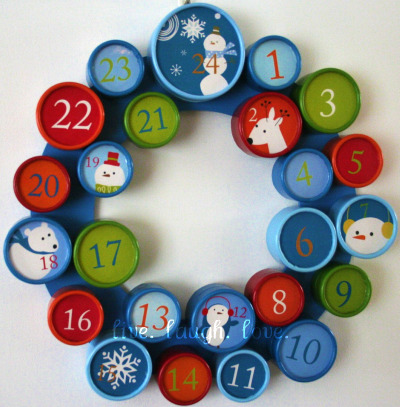
Not only Christmas, but the whole of December seems to be a time of rushing, gifts, joy and family time. The decorations start to spring up everywhere and you just cant wait for the day! And since there are all sorts of countdowns to special occasions, well why not create your own countdown to Christmas by making an Advent Calendar. It is a great gift, arts and crafts project as well as a festive decoration full of all sorts of treats, depending on how you wish to design yours. You can also tweak this idea to make an advent calendar for events other than Christmas, just make sure you decorate it according to the season, holiday or the celebration, everything else stays the same!
What you will need to create your own wreath Christmas Advent Calendar:
- A few sheets of Holiday/ Christmas themed scrap booking paper. These sheets can be all the same or you can get different ones and make the colors work together.
- Gift wrap! Make it shiny, colorful and festive.
- Crafts glue.
- Paints, acrylic, water colors or even markers will do, the choice is up to you.
- Twenty five small boxes. You can use the small paper mache boxes from crafts stores like Joann's, Michael's, Hobby Lobby or any other that is close to you. They usually are quite cheap, however if you have match boxes lying around that will do great as well, and you can always mix and match.
- A Styrofoam wreath ring. Make sure it is big enough to fit all your boxes onto it.
- Wide ribbon, you can get the kind used for bows on gift-wrap or you can use the gift-wrap paper cut into strips to wrap around the Styrofoam wreath ring.
- A pair of scissors.
- Twenty five pieces of sweets, be it candies or chocolates it is up to you.
- Any other decorative accessories you might want to use such as glitter, various stickers, etc.
How to create your own Christmas Advent Calendar:
- First of all you will need to decorate your small boxes. You can either paint them or gift wrap them. If you use gift wrap (or scrap booking sheets) make sure you wrap the box and the lid separately so the lid can be taken off the box.
- Put one number on each lid until you have a lid for each of the twenty five days. The decorating part is really free style, so let your imagination roam and have fun.
- You might want to decorate the inside of your boxes (the bottom at least) also, as each day passes the lids are going to be taken off to remove a number so the inside of the box will be showing. Just keep that in mind.
- Once all of your boxes are done its time to work on the wreath ring. You want to wrap it up into ribbon or gift wrap so none of the foam is visible. Make sure that the ribbon is secured firmly in place as you will be gluing the boxes onto it!
- Now, you will glue the boxes in a circle onto the ring, you can put the numbers neatly in order or mix them up. The mix up works really good if you had different size and shape boxes. Use crafts glue to glue the back of the boxes down onto the wreath ring. Follow the instructions on the glue you use as far as the amount and drying times go.
- When your boxes are all down and your wreath is completed it is time to fill each box with a sweet. This actually doesn't have to be a candy. Depending on what you are going for it can be anything from chocolate, small message or a tiny gift.
- Put the lids on all of the boxes once they have filled up and your advent calendar is ready to go! Give it as a gift or hang it up as decor.
No comments:
Post a Comment