Showing posts with label project. Show all posts

Monday

Cookie cutter ornaments


Check out this article on how to make some lovely Christmas ornaments with cookie cutters! It really doesn't get much easier than this!


HeliumHow to make cookie cutter ornaments


Sunday

DIY: Microwaveable Heat Pack

heat pack
A heat pack I made.


Be it cramps, toothaches or muscle pains heat pack always comes in handy. During the cold winter months you don't even need to be hurting to make good use of a heat pack. These cozy bits are a perfect pair with a cup of coffee (or hot chocolate if you like) to keep you warm this winter. So instead of paying a ton for one at a store why not make an arts and crafts date with your pals and make a batch of them? Have some for your own use or to give away to friends and family. They make a great gift alone or paired up with some other goodies. They can come in any shape or color you can create with your hands. They can be created flat as a coaster so that they release a fragrance when a warm cup heats them, or as a favorite stuffed toy to warm up your little one during the cold nights. The following is a basic "how to" for a heat pack. Again, you can make it any way you like just apply the changes to the basic instructions and you are good to go.

What you will need to create your own heat pack:
- Bird seed, or some other small grain. You might not want to use things such as rice  as it is sharp and could poke out if a piece doesn't happen to be lying flat with the other ones.
- Fabric. Anything will do pretty much but when you go out to buy it ask the sales person (or Google it) whether it is microwave safe. You don't want your lovely creation to be a fire hazard now do you?
- Either a sowing machine or just the thread and a needle if you opt to do it by hand.
- And an optional touch of fragrance with dried herbs if you so desire.

How to create your own heat pack:
- First think of the design, shape size, etc. and draw it out.
- Fold the fabric (make sure you have more than enough when folded for your heat pack) in half with the face side in.
- Then transfer the design (exact measurements) onto the back of the fabric (not the side with the design).
- Cut the fabric according to the shape you chose, but not along the lines of the drawing, instead leave at least an extra inch.
- Either with the sewing machine or by hand, sew three fourths along the way of your design then stop.
- Turn the fabric inside out (or right side out more like!).
- Fill it up with your choice of seed and any herbs if you chose to do so.
- Sew up the remainder of the fabric to close up the hole. In this place I like to create a tag with my initials or the person's whom I'm giving it to...just something fun that will also cover up the difference you can see after sewing the fabric once turned out.
Your heat pack is now all set. You should give it a test drive. Pop it into the microwave for a minute, two at the most and see how its working out!


Wednesday

DIY: Christmas Candy Hearts


While those candy hearts with messages on them have become so common around the Valentine's Day the truth is they aren't that great. We all love the cute idea but the cheap mass produced candies are faulty to the point that we might even feel bad giving them to someone! They don't taste that good, the messages are often faded, and the candies are mostly worn out or broken. So how can you preserve the adorable idea, personalize it and make the gifts last longer than a day? Easy, buy making these candy hearts for your darling out of polymer clay. They wont be edible but they will surely be cherished more than the originals were. You can even put your own short messages on them to surprise your loved one. And what is even better, now you don't have to wait for Valentines day to come around you can make a little twist and do these for your hunny on Christmas as well! 
What you will need to create your own clay candy hearts:
- Polymer clay in green and red, one block is about two dollars in your arts and crafts store, cheaper online.
- A straight edge knife or a craft blade.
- A few toothpicks.
- If you wish to make a mold of the hearts then you will need the Sculpey Mold Maker. If not then you can just shape your candy heart by hand.
- Red paint, tempera works fine.
- A super thin paint brush, or if you want just use the toothpick to draw on the messages.
- Baking tray and an oven, not a microwave!
- A list of short messages to put on the clay hearts.
- A packet of the actual candy hearts, for reference...and a snack.
How to create your own clay candy hearts:
- First make sure you have a nice clean surface to work on, you don't want hairs or other bits getting into your clay.
- If you are using a mold to create your hearts follow the instructions on the box for how to actually make the mold. Also make sure, when you are making it, that you press in the non letter side of the candy into it so you have a clean slate later on.
- In case you don't want to use a mold just form the hearts by hand, use the actual candy as reference. Its not hard and really you don't need a mold unless you are making a great number of them.
- After your hearts have been formed just let them sit a bit to harden, so they are not as mushy from your fingers.
- Alright now the messages, I personally do them with paint and a toothpick, freehand. Some people print them out then use rubbing alcohol to create transfers.
- Pick a short message and then carefully write it on the heart. The more unique and personal to the receiver of the hearts the better.
- Let the paint dry completely.
- Line the hearts up on the baking sheet and bake according to the manufacturers instructions.
The clay hearts are now complete. As for packaging, it all depends on you but here are a few examples... You can buy a pack of real stuff, carefully open it put the clay ones in among the real ones and re-seal the bag. It takes a little practice but its a nifty idea when you get it. You can also put them in small boxes from craft stores or in a Valentine's Day themed cellophane goodie bag.

Saturday

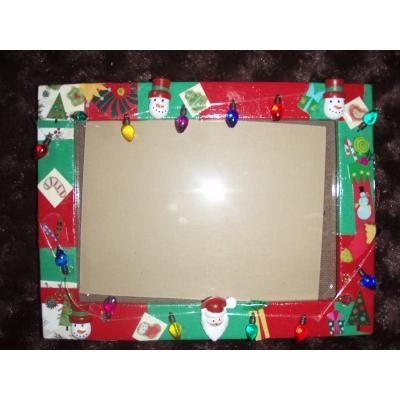
DIY: Christmas Picture Frames


What better way to show off your Christmas spirit then to make a winter wonderland type of a picture frame? These are great as gifts or to be used for your own decor, and not only that they are so fun to make. If you are a family person you can grab your family members and have some together time making a few of these and putting each persons favorite photo in. If you want it is also a great arts and crafts project for a bunch of friends on a cold winter afternoon! If you are thinking this project is not for you due to your lack of creativity and skill in crafts you are mistaken. This can be done by anyone, from a toddler to a professional craftsman! Another thing to mention, as its so important to everyone in today’s economy, it wont cost you an arm and a leg and it makes a perfect gift so….hint hint.

Read more:
DIY: Christmas Picture Frames