Showing posts with label gifts. Show all posts

Sunday

Make your own gift tags this season

Christmas Gift Tags
DIY Gift Tags


Materials:

  • 300 gsm white, red or green card
  • Red and sage-green felt
  • Sewing needle and deep red embroidery thread
  • Holly leaves
  • Deep red silk fabric scraps
  • Red ribbon
  • Craft knife, steel edged ruler, cutting mat, hole punch and double sided tape


  1.  Choose any color card paper to make your gift tags to the size you require. Cute out a rectangle shape with a craft knife and a steel edged ruler on a cutting mat (or if you are not stocked up with all the crazy crafts equipment improvise with scissors). 
  2. Punch a hole in the corner.
  3. Repeat the steps until you have as many rectangular cards as you need (one per tag).
  4. Attach the red felt to half of the card and the green felt to the other half of the cards using a double sided tape.
  5. Trim any excess off.
  6. Using a sewing needle and embroidery thread, sew holly leaves to the felt side of the red felt cards with one cross- stitch, tying the thread at the back and trimming the excess.
  7. Cut three small squares off the silk and using double sided tape, glue it to the felt side of the green felt cards overlapping them at jaunty angles.
  8. Add a small sage green felt heart to one of the silk squares with double sided tape.
  9. Thread a length of red ribbon through each hole and make a knot in the ribbon.  

How to make a wreath Advent Calendar

Not only Christmas, but the whole of December seems to be a time of rushing, gifts, joy and family time. The decorations start to spring up everywhere and you just cant wait for the day! And since there are all sorts of countdowns to special occasions, well why not create your own countdown to Christmas by making an Advent Calendar. It is a great gift, arts and crafts project as well as a festive decoration full of all sorts of treats, depending on how you wish to design yours. You can also tweak this idea to make an advent calendar for events other than Christmas, just make sure you decorate it according to the season, holiday or the celebration, everything else stays the same!


What you will need to create your own wreath  Christmas Advent Calendar:
- A few sheets of Holiday/ Christmas themed scrap booking paper. These sheets can be all the same or you can get different ones and make the colors work together.
- Gift wrap! Make it shiny, colorful and festive.
- Crafts glue.
- Paints, acrylic, water colors or even markers will do, the choice is up to you.
- Twenty five small boxes. You can use the small paper mache boxes from crafts stores like Joann's, Michael's, Hobby Lobby or any other that is close to you. They usually are quite cheap, however if you have match boxes lying around that will do great as well, and you can always mix and match.
- A Styrofoam wreath ring. Make sure it is big enough to fit all your boxes onto it.
- Wide ribbon, you can get the kind used for bows on gift-wrap or you can use the gift-wrap paper cut into strips to wrap around the Styrofoam wreath ring.
- A pair of scissors.
- Twenty five pieces of sweets, be it candies or chocolates it is up to you.
- Any other decorative accessories you might want to use such as glitter, various stickers, etc.

How to create your own Christmas Advent Calendar:
- First of all you will need to decorate your small boxes. You can either paint them or gift wrap them. If you use gift wrap (or scrap booking sheets) make sure you wrap the box and the lid separately so the lid can be taken off the box.
- Put one number on each lid until you have a lid for each of the twenty five days. The decorating part is really free style, so let your imagination roam and have fun.
- You might want to decorate the inside of your boxes (the bottom at least) also, as each day passes the lids are going to be taken off to remove a number so the inside of the box will be showing. Just keep that in mind.
- Once all of your boxes are done its time to work on the wreath ring. You want to wrap it up into ribbon or gift wrap so none of the foam is visible. Make sure that the ribbon is secured firmly in place as you will be gluing the boxes onto it!
- Now, you will glue the boxes in a circle onto the ring, you can put the numbers neatly in order or mix them up. The mix up works really good if you had different size and shape boxes. Use crafts glue to glue the back of the boxes down onto the wreath ring. Follow the instructions on the glue you use as far as the amount and drying times go.
- When your boxes are all down and your wreath is completed it is time to fill each box with a sweet. This actually doesn't have to be a candy. Depending on what you are going for it can be anything from chocolate, small message or a tiny gift.
- Put the lids on all of the boxes once they have filled up and your advent calendar is ready to go! Give it as a gift or hang it up as decor.


Wednesday

DIY: Christmas Candy Hearts


While those candy hearts with messages on them have become so common around the Valentine's Day the truth is they aren't that great. We all love the cute idea but the cheap mass produced candies are faulty to the point that we might even feel bad giving them to someone! They don't taste that good, the messages are often faded, and the candies are mostly worn out or broken. So how can you preserve the adorable idea, personalize it and make the gifts last longer than a day? Easy, buy making these candy hearts for your darling out of polymer clay. They wont be edible but they will surely be cherished more than the originals were. You can even put your own short messages on them to surprise your loved one. And what is even better, now you don't have to wait for Valentines day to come around you can make a little twist and do these for your hunny on Christmas as well! 
What you will need to create your own clay candy hearts:
- Polymer clay in green and red, one block is about two dollars in your arts and crafts store, cheaper online.
- A straight edge knife or a craft blade.
- A few toothpicks.
- If you wish to make a mold of the hearts then you will need the Sculpey Mold Maker. If not then you can just shape your candy heart by hand.
- Red paint, tempera works fine.
- A super thin paint brush, or if you want just use the toothpick to draw on the messages.
- Baking tray and an oven, not a microwave!
- A list of short messages to put on the clay hearts.
- A packet of the actual candy hearts, for reference...and a snack.
How to create your own clay candy hearts:
- First make sure you have a nice clean surface to work on, you don't want hairs or other bits getting into your clay.
- If you are using a mold to create your hearts follow the instructions on the box for how to actually make the mold. Also make sure, when you are making it, that you press in the non letter side of the candy into it so you have a clean slate later on.
- In case you don't want to use a mold just form the hearts by hand, use the actual candy as reference. Its not hard and really you don't need a mold unless you are making a great number of them.
- After your hearts have been formed just let them sit a bit to harden, so they are not as mushy from your fingers.
- Alright now the messages, I personally do them with paint and a toothpick, freehand. Some people print them out then use rubbing alcohol to create transfers.
- Pick a short message and then carefully write it on the heart. The more unique and personal to the receiver of the hearts the better.
- Let the paint dry completely.
- Line the hearts up on the baking sheet and bake according to the manufacturers instructions.
The clay hearts are now complete. As for packaging, it all depends on you but here are a few examples... You can buy a pack of real stuff, carefully open it put the clay ones in among the real ones and re-seal the bag. It takes a little practice but its a nifty idea when you get it. You can also put them in small boxes from craft stores or in a Valentine's Day themed cellophane goodie bag.

Monday

Homemade candle gift

Over the centuries candles have came a long way. From plain slabs serving a single, but very important, purpose to elaborate art pieces showing of craftsmanship of its maker. While we don't, in general, need them purely as a light source (except in extreme situations) we still use them in our every day lives.
They are given as gifts, used as mood setters or fragrance releases, as well as decor pieces. But with all of their multipurpose comes a price. Not only of monetary value, but the price of having to settle for the generic store bought as well for many of us. Quite a number of people don't realize how simple and fun it is to make your own candles and even better give them out as personalized gifts. Here I will show you how to make your own candles, the simple way.

What you will need to make your own candles:
- Paraffin wax. This can be bought at any of your local arts and crafts stores such as Michael's, Joann's or Hobby Lobby.
- Wicks, one per each candle you are making.
- A candle mold. You can either buy these shaped at the store or use make shift molds from plastic containers and pretty much anything that can withstand the hot melted wax.
- An optional touch gives adding the fragrance. These too are found at your local arts and crafts shop.
- Candle dyes in your choice of colors. These come in either the liquid form or as chips.
- A candle jar or a holder.
- A heavy pot and spatula.
How to make your own candles:
This process is fairly easy, however you need to use extreme caution as it can turn dangerous easily.
- First thing you should do is melt the paraffin wax in the heavy pot. If you can it is suggested you do this in a double broiler if not on nice heat while stirring so the heat would be distributed evenly.
- Once the wax is melted add your color and the fragrance according to the manufacturers specifications.
- Make sure you stir it in well.
- Now pour the melted candle wax into the molds carefully and add a wick to the middle.
- Once your candles are cooled you can take them out of the molds and you are all done.

Tips:
- It is suggested that its better to use an electric vs. gas stove. In case you have a mishap with the wax and it gets out of the pot there is less chance of it catching on fire on an electric stove top, wheres the gas one would make it catch in flames.
- You can add in non flammable objects to your molds before you pour the wax for fun effects.


Wednesday

Santa Hat Christmas ornaments

Of all the fun Christmas craft projects you can do for your home I find the small handmade ornaments to be my favorite. The little goodies are so unique and completely yours, they don’t look like the standard round shiny ornaments you can find at the store. These are tiny Santa’s, comical snowmen, my pet dog, the favorite Christmas cookie, my own one of a kind snowflake, etc. They are a great activity for an individual or a family of ten. And even better, you can store them away and collect more and more each year, even pass some on to your children one day.
While handmade Christmas ornaments are very versatile in the shapes, sizes and materials used for this occasion I have decided to create a small clay Santa hat ornament, if you are curious to find out how just read on!
What you will need to make your own clay Santa Hat Ornament:
- Red Polymer Clay. You can get a block of it for two bucks at Joann’s, Michael’s or any other crafts store. You will need less than one fourth of the block.
- White Polymer Clay. Same applies as for red.
- A few toothpicks.
- A few sheets of printer paper. You can use other stuff to protect your work surface just make sure none of the color will transfer onto your clay.
- Some festive string, not too thick.- A knife or a crafts razor.
- Some sort of a stubby screw driver or a different object of a similar shape. You will need this to put the hat on while fluffing the white of it.
How to make your own clay Santa Hat Ornament:
- First set up your work surface, protect it with paper or whatever else you might have decided to use and get your supplies ready.
- Break off a piece of the red Polymer clay, the amount depends on your desired ornament size so be vary of that when deciding how much you will use. Start shaping it into a sloppy cone.
- Once you have the approximate cone shape start working the top end out to shape it like the Santa’s hat (photo 1).
- Every once in a while you might need to stop working on your ornament and let the clay set a bit. This depends on a ton of factors like humidity and temperature, but the point is you don’t want the clay to become too soft and flimsy or it will be very fragile and a pain in the butt to work with!
- Take a small piece of white Polymer clay and start working it into a ball, this will be the fluffy tip of the hat. Flatten the ball and wrap it around the red tip of the hat.
- Repeat a few times until you get a bulb like shape on the end, once you have the shape apply one more layer of white (photo 2).
- Again, be wary of the clay becoming too soft. If it is OK to work with take a bigger piece of white Polymer clay and roll it out into a snake like shape.
- Apply it in circle around the base of the hat (photo 3) press down slightly so that it sticks to red but don’t smush it.
- Now that you have the basic shape of the Santa hat going on grab that screw driver and the toothpick.
- Use the screw driver handle as a head and place the hat on top of it. Now, and do this carefully not to knock it off, scratch up the white around the base with a toothpick (photo 4).
- When you are done it should look something like this: (photo 5).
- Now repeat the process on the ball of white, make sure you are extra careful because the tip is thin and you don’t want it all breaking off, (photo 6).
- Once again let the ornament set a bit. You might find this annoying but trust me it will help you as far as flimsiness and stability of it go.
- Take a toothpick and poke a hole at the top of the ornament, the top being where the hat folds. You will make the hole by slowly pushing the toothpick through the clay while spinning it. Have your finger on the other side where it should come out (photo 7), once you feel it poke your finger gently take it out and repeat the same from the other side. What this does is it ensures that you have a nice clean hole (photo 8).

- The pre-baked product will look something like this: (photo 9). You can smooth it out if it looks rough like mines.


Saturday

Spa gift basket

Moms, more than anyone appreciate handmade gifts. From the time their child brings home their first finger painting as a gift their heart grows fond of anything their child does. This Christmas can be the time when you combine her love of a personal touch with something she will actually be able to use and enjoy. Why not give her a lovely home made gift basket? They can be assembled by people of any and all skill, filled with store bought or handmade items and always full of love.
One thing all moms could use is a bit of relaxation so why not set up a spa like gift basket accompanied by a "coupon" for a day off. One day, just for her to have the house all to herself and relax away.

What you will need to assemble your spa gift basket:
- A basket, you can use a bread basket rather than one with a handle. Plain ones come in either square or round shapes and go well with any assortment.


- Some tissue paper.
- One home made soap, for instructions on how to make read: "How to make soap".
- A set of home made bath bombs, for instructions on how to make read: "How to make bath bombs".
- A home made eye mask, for instructions on how to make read: "How to make an eye mask".
- A cheap MP3 Player, you can get one online for under fifteen bucks.
- A sponge or a loofah, opt for non colored natural looking ones instead of the bright pink or blue sponges.
- Hand towel, they can be bought without a set and are cheap so get a good quality one at your nearest store.
- A pack of chocolates, try the Dove Promises. There is something luxe about Dove and their chocolates really are high quality.
- Some clear plastic wrap.
- A bag of seeds, this is optional.

How to assemble your spa gift basket:
- The first thing to thin about, before even making any of the hand made contents, or buying anything is the color palette. Thoughts of spa make us think of relaxation, of mild natural colors that are easy on the eye. Colors with some contrast such as light greens and browns (espresso brown for instance) is a pleasing color combination. Basically anything that reminds you of nature and calmness.
- Now with all that in mind go out and buy or create the components of the basket.
- Load the MP3 player with soothing and relaxing music.
- Once you have all of your pieces its time to package them.
- Line your basket with a few pieces of tissue paper, crinkling and the paper falling out over the edges is ok!
- This part is optional, if you want you can either use your left over flax seed or buy a bag of bird feed that doesn't have an odor and has brownish coloring such as the seeds below seeds. Pour the seeds into the basket, on top of the tissue paper.

- Now assort your towel, soap, bath bombs and rest of the stuff by sticking them into the seeds.
- Once assorted you want to wrap it up, you can use either clear cellophane wrap if you want a roomy crinkly effect, or you can use clear wrap (the kitchen kind) for a compacted sleek look.
To make the coupon you can print out a template and by using either Paint, Photoshop or other similar programs type in your offer. Type out something along the lines of "Good for one stress free afternoon" or think up your own line. Stick the coupon into the card you will be presenting along with the gift basket. This is sure to be one of the more appreciated gift she has gotten in quite some time.

Friday

Homemade holiday food gifts

Homemade holiday food gifts are not only great because, well everyone loves food, but also because food is so versatile. These gifts can be made to fit any holiday, with tons of colors, and all sorts of different themes. A holiday themed homemade food gift is fail-proof; everyone will just adore it!
One of the most important parts of food-based gift giving, next to a great tasting treat, is the personalization. Imagine the difference in getting a plain plate of cookies, or receiving a nicely packaged (don't worry it is not expensive, nor difficult) box or gift baggy of your favorite cookies, with maybe a note or a card attached, in the least. Quite a difference, is it not?!
homemade food gift
Goodhousekeeping.com

There are many ways to package your home made food gifts. If, for instance, you are giving away things which are in jars maybe, such as home made jams or jellies, you could do a variety of gift baskets. If you are making home made candies, then the gift baggies are a nice choice to be considered. If you are giving a larger amount of candies, especially if there is a variety of flavours and types, then you could do gift baggies in the gift baskets. In case you are making cookies, cakes, fudges, or any other desserts similar to those, you could use some of the lovely and adorable paper boxes that you see in crafts stores. Either way you desire to wrap it the effect will be a lot greater than your plain packaging, and it is also budget friendly (very important in today's economy!).

Another way for you to personalize your homemade food gifts is to make sure you know what the person likes. You do not want to give a chocolate-lover the vanilla fudge! On top of that, keep the gift recipient in mind when decorating, especially if it is cookies that you are making. Icing is very versatile. You can write the person's name, greetings, an occasion related message, or draw something that relates to them.


When you get your gift baggies, baskets, or boxes from the arts and crafts store, make sure to grab a greeting card (finished or blank ones), or some blank tags. The tags are a wonderful way to show your artistic side and create a uniquely presented gift for your cherished ones. If you have time, and feel up to it, please don't shy away from making a hand made greeting card, or writing a cute note to the recipient.

You do not, by any means, have to make great elaborate creations, or be a chef or a baker such as the ones you see on the television these days. After all it is the thought that counts. Well... that and it still would be nice if it tasted yummy on top of that thought!

Wednesday

On the road drivers: Stocking stuffer ideas for those back home

For those of you constantly on the road it must be hard being away from your family. You probably have a lot of missed holidays and weekends away from home going on. To top it all off buying Christmas presents is quite a limited task. You are left to the mercy of the very few truck welcoming places, even Walmart is deciding to put up the "this tall" bars on their lot entrances so semi trucks can't enter. So you are pretty much left with what? The truck stops you frequent, which all carry the same stuff more or less.

You can get around this problem with a little spontaneous planing. Yes that is right, spontaneous planing. How the hell does that work you ask. Well a month or two before Christmas you make a plan to spontaneously buy a thing or two in each state, city or peculiar truck stop you come by. If the money is tight don't fret at the thought of buying a ton of stuff. These are small but very dear items, the stocking suffers, not big gifts. So none of it should be expensive.
And what to get? Well it all depends on who you have on your list. But here are a few things I have come across which I don't see every day. They might prove to be interesting gifts for someone you know.

If you are heading out East, maybe to CT, NY, Maine, etc. grab a few cubes of the delicious fudge...or Deer Poop. I'm all for the goodness of fudge but the Dear Poop (most often nuts or raisins covered in chocolate) bags make for a great gag gift.
Apparently Montana has Deer Poop too!

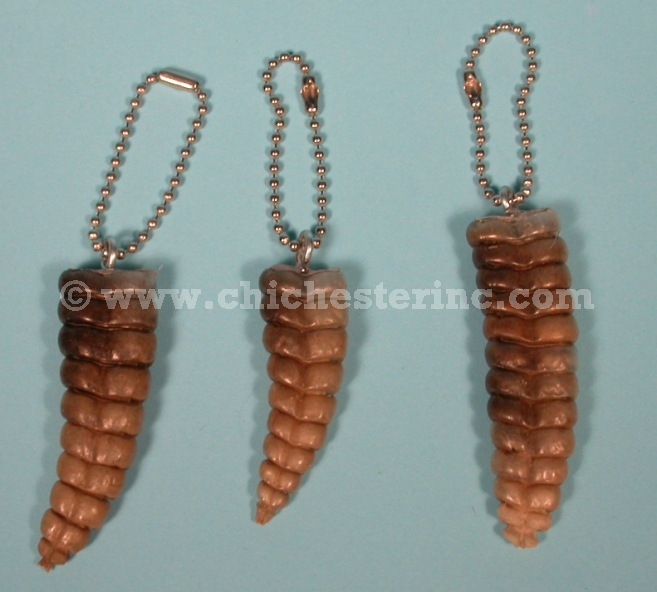
In case you are going down south towards Florida and such you can get an alligator foot, or a head even. They range from tiny made into a key chain to quite big and are real. If you move on over towards Arizona you can get another key chain item, this time its heads and rattles of the rattle snakes. I don't know about you but little things like that are so cool to me, especially if it is something new that I haven't been around. Another thing is the Native American tea from the tee-pee on the border of NM and AZ on I-40.

Up north, in the Dakotas maybe? Get any of the Buffalo sausages or other cured meats. If you drive through Salt Lake City, Utah stop buy and get some of the salt from the lake. It is a great souvenir and it takes a minute or two to get free of charge.

These are just a very few pieces I found peculiar in my travels and couldn't resist buying. Wherever you go you will be sure to find a souvenir trinket for your loved ones back home.

Sunday

DIY: Christmas Cards

Custom made greeting cards are very easy and fun to make. Not only will you enjoy the process but the recipient will be very pleasantly surprised when they receive your special card in place of store bought bulk card... 
To read the full article please visit: DIY: Christmas Cards | Quazen


Scrapscene ran an "Altered Envelopes" contest at one point and let me tell you, there were some impressive entries. 
If you need some inspiration and ideas take a look at these beautiful envelopes: